Manoir Makeover - more doing it up #5
The Unadventurous Traveller
My family and I found ourselves living in Central France, in La Creuse - department 23, in a large Manoir/Chateau. We were located in the foothills of the Massif Central, which can be very rainy (thus making everything lush and be able to grow wonderful produce) but it can also be very hot in the summer, and very cold in the winters - a continental climate. It had taken more than 6 hours to drive down to this area from Calais (far more if you get lost around Paris!) and we didn’t know a lot about the region, other than what we had researched and seen on the internet.
La Creuse is a really beautiful area, very rural, with some large towns dotted about and some cultural history about the stone masons and the work they did in Paris and the region, mentioned in the last blog. The Limousin region is renowned for its Limousin cow; a hardy, generally healthy and adaptable animal that could be as old as the whole continent! Old cave drawings of approx. 20,000 years old, show cattle that look incredibly similar to the Limousin cows of today. The Limousin cow is the original breed from which all other breeds are descended..
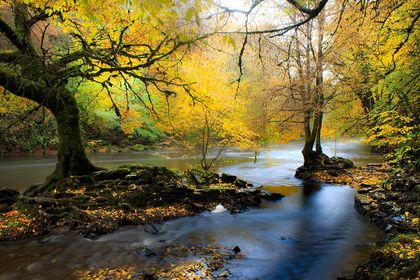
There were two rivers near to us; La Creuse and La Petite Creuse, that joined at Confolens. Monet spent time in this area and painted several pictures; there is a Monet trail you can visit, along with plenty of fishing, hiking and exploring the wonderful woodlands and lakes. L’Office de Tourisme is very helpful and can provide you with maps and information on what to do when visiting the area.
The area is vastly under-populated, due to higher wage offerings and greater opportunities in cities, so Creuse has seen a decline in population over the years. It seemed to us that many people, particularly Parisiens, went to La Creuse to retire. If you are of working age the career prospects are quite limited. However the people are down to earth, genuine, and hard-working folk who would pull together as a community when needed.
We continued with the renovations on the house to make it a nice liveable space but also to make it comfortable for us all, and in keeping with the style of the property.
Labour of Love
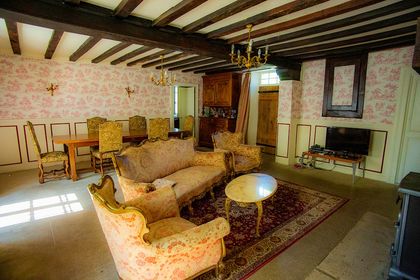
The lounge was very large, around 40m2. We used this as a lounge and dining room, comfortably accommodating a 3m solid oak dining room table and eight chairs.
The lounge was so grand it needed decorating with something stunning and fairly imposing, however there were many other things that needed to change before we could decorate.
Central Support
Firstly we needed to sort out the fireplace and some of the pillars and the awkward support that you can see in the photo. When we first arrived, this supporting post was in the centre of the main ceiling beam which happened to be really awkwardly placed in the room, right in the way of the settee and chairs (I am sure they had no idea when inserting this support what a nuisance it would be for TV viewing some 200 years+ later). This was for the main structural beam running across the lounge ceiling. It was, no doubt, put in place when the beam was first installed ‘green’ to add extra support.
Now, many many years later, Dale was certain we didn’t need this support post in place any longer. By removing it, it could have meant the whole structure would collapse or at the very least the upstairs floor could start to dip. However to test it, Dale implemented an acro in place of the post and dropped it down by a few millimetres to see if there was any movement. Every day for three or so weeks he checked, but the gap did not change. The post was unnecessary! Hurrah!
Yorkstone be Gone!
There were two other bricked pillars in the room and the fireplace which were all made of York stone - which we didn't like at all. Dale plasterboarded the pillars to make them look like the rest of the room and then set to knocking out the old fireplace, stone by stone. We had planned to have a wood burner instead of the insert that was in place when we first bought the house.

Whilst removing these stones he found a small access hatch above the fireplace which, upon closer inspection, revealed a beautiful inglenook fireplace behind the facade. This was like finding hidden treasure for Dale! He could not wait to uncover the hidden inglenook fireplace and reveal its true glory.
To be honest, I was not totally convinced we needed this radical demolition. I thought it sounded like an awful lot of fuss and mess and how long would it all take? He thought it would just take an afternoon - but three days later he was just about finishing! The mess and dust were unbelievable but he was right, the fireplace looked so much better. All this work took much time, effort and thought to plan what was needed.
Fighting the Creuse Winters
Finally we bought a new wood burner for the new fireplace and we were so much happier with the look of it. It threw out a far better heat thanks to new efficiencies in modern woodburners and heat being produced from all three sides of it.
As you can see from the photos, the woodburner had a back boiler. Dale was able to install a full central heating system powered from it (30kw). This took a very long time to install, so I don't want to give the impression we did all this in the first 6 months or anywhere like that! We didn't install the central heating system until some years later, but it seems the best place to tell you all about the process.
The house was really jolly cold for many months of the year, as we found out that first year. We usually had to light a fire from September through to the end of May. One winter there was a day when the temperature reached -16 degrees, but frequently the temperatures were in the region of -8 degrees! Whilst the kids loved it, I am really not cut out for that kind of temperature. As I was working all day, mainly on the computer and pretty sedentary, I wasn’t moving around and creating my own heat, so I would get colder and colder. The study where I worked was located over one end of the outside cellar, which allowed the cold to permeate up through the floor, making my feet even colder. I found that wearing three pairs of socks was not conducive to shoe wearing! I would get colder and colder, so cold that my fingers and toes developed chilblains (I know, I know, poor me, but they looked unsightly and hurt a lot for weeks on end!!) The only remedy was to try and keep warm, with leggings under jeans, insulating underwear (attractive), fingerless gloves, and more - but they didn't warm me well enough.
F F Freezing
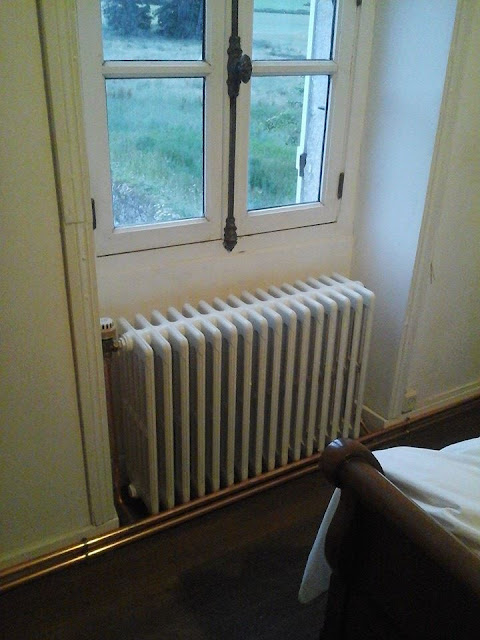
We needed heating! There is a website in France that many people use for selling their second hand items, along with properties, cars and old surplus goods etc. Dale searched through the online selling places for cast iron radiators for sale. They appeared for sale from time to time as people renovated their houses and put in new, electric, or improved radiators for their homes. However these were just the radiators we wanted, to be in keeping with the style of the property, but also to provide some well needed heat during the winter months.
So after buying many old cast iron radiators (for many rooms) and heaving them in the truck to bring back home, Dale cleaned them up, sanded them down and painted them. We then had to heave them into place using sheer strength as they weighed an absolute tonne! He then began connecting the radiators up to the copper piping he had run through to every room, through skirting boards and floorboards, all on one circuit, down to the lounge to the back of the woodburner. We had to buy a pump as it was such a vast system. After much watching of YouTube and researching of systems and ‘how to’ implement such systems, we purchased a pump online and Dale set up the system. The woodburner did come with instructions on how to install such a system, too, which used an overflow chamber in the loft. We bought quite a few copper pipes back with us from one trip to the UK, as we found the piping to be substantially cheaper there, however we made sure only to buy pipe in the 18mm and 22mm sizes, to be comparable with the French sized copper pipes, as all the other sizes were different. Dale found the French copper piping was more expensive but a thicker gauge, so better quality. We had to buy bends and connectors in France to make the system fit a bespoke house of course.
So once again Dale changed his ‘hat’ from that of general builder and decorator, to plumber and heating installer! We found during the course of living in France, Dale changed his ‘hats’ many times and became very good at many new things.
70 Years of Grime
The lounge had several beams running the width of it which connected to the central beam running the full span of the room. They were old, made of oak, very large and sturdy and very dirty black. They had probably turned black after years of open fires and grime accumulating over time. Dale decided that what they really needed before we started to decorate would be to give them all a good clean. The lounge was a very dark room, with two standard sized windows on one side of the room but as the walls were extremely thick, the light had trouble coming through. Whilst cleaning and therefore lightening the colour of the beams would not bring in any more light, it would certainly help the appearance of the room by not having such a dark, imposing colour weighing down on you from the ceiling.
He firstly began to clean them with a wire hand brush and realised this was going to take a very long time, so he then found a wire brush attachment for his drill and began to tackle this task in a little more mechanical way. He could have sanded each beam down but we didn't want the authentic shape, blemishes or fissures on each beam to be lost, just to remove the black coating. In this undertaking Dale became absolutely covered from head to foot in black dust. He had to wear a mask so as not to breathe in all that dirt.
Needless to say every piece of furniture had to be covered and we couldn't use the whole lounge for over a week. He cleared up (well, with some assistance) at the end of every day, and went off for a well earned bath and de-grime! Afterwards the beams were a lovely light oak colour again. But Dale knew that to protect the beams they needed some coating so he covered them in linseed oil, which although it darkened them made them a golden oak colour, they would be protected for many years to come.
He then measured, cut and inserted new plasterboard in between each beam, as prior to this there were just the floorboards from above. This fiddly, time consuming job made the beams stand out, and also added to the much needed light in the room.

Panels in Place
Dale loves to research, and began to think that by adding panelling in the lounge would provide more interest to the large expanse of wall and would be in keeping with the style and age of the house.

After measuring all the walls across the length and width of the room, he discovered that the walls were not square! Of course not; however, he persevered in his measuring, cutting and creating the blank canvas to work off. He started by glueing plasterboard to the walls to a certain height to make the paneling stand out and added a dado rail at the midway point. He then carefully cut beading, the same size, to make rectangular panels and used adhesive to keep them in place all the way round the bottom section, throughout the whole lounge.
Decorating
We tried several different colour combinations for the bottom area of the wall, with a lovely deep red to start with, which beautifully matched the curtains, the rug and the wallpaper. However this colour just added to the darkness of the potentially gloomy room, so we changed this eventually to a cream/white colour on the bottom, so adding the much needed light and also ensuring it matched the wallpaper.

We found some Toile de Jouy wallpaper in deep red and cream/white. Like French paint, French wallpaper is very expensive, but this paper was worth it, it looked lovely and totally in keeping with the style we were looking for to suit the house. Buying antique French furniture to suit the house was also something we enjoyed and we didn't want to keep the modern, leather settee we had arrived with, long term. We found a Louis Philippe settee and two chairs for sale online, which would be ideal. We loved buying French furniture, often from house clearances, but always from incredibly nice, interesting vendors. They were amazed at the amount of furniture we could get on the back of the pick-up truck (all legally and safely), and we often told them where their item of furniture was going to go to now. We arrived home with the settee and chairs and installed them in place. They fitted the house perfectly, the look was ideal. But this was THE most uncomfortable settee we have ever had - looks won over comfort!!
We found a lovely, large rug in red hues (and a matching green one for the snug) which worked well to keep the cold out from the floor. Whilst I hadn't quite perfected the curtains, we had some lovely times in the lounge that was now feeling homely and, best of all - warm!
Where one door closes, another opens. ~ Don Quixote
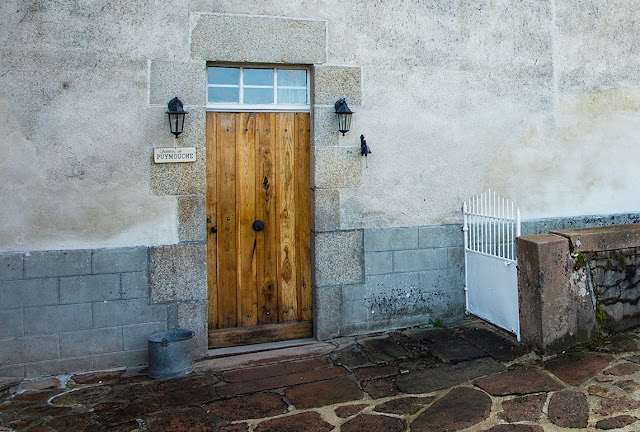
The original front door was very draughty with no frame to it, just using the granite set which was the border around the door. It let in a lot of cold and wind, and it wasn't very nice looking either. It matched the back door, which was made of oak, but had been painted white and was beginning to rot at the bottom and just looked shabby. In time, Dale (having finished other projects) decided he was going to make a new front door. We had been given some oak planks from one of our neighbours as they were surplus and taking up room in his shed. In fact there were a good 100 planks, approx 35 mm thick x 2.5m long. We made good use of these planks for many different projects, from putting a new floor in the gite to making a beautiful new front door for the house.
He took the measurements of the existing door, and started to cut, plane and sand the planks to make the door. He glued the planks, using clicky straps to keep them together whilst setting and cut to fit some back braces, using other oak planks for support. All the hardware from the original door (hinges etc) then went onto the new door. To cover up the joints on the front of the door, Dale cut some oak beading and fitted it to the joints to give it more character. This proved to be another ‘hat’ to add to Dale’s skillset - that of carpenter.
A draught excluder added to the back, along with a giant new doorknob that Dale sourced from Ebay, a doorbell received as a gift from my lovely friend, and two new outside lights, all set the new door off a treat! An artist friend of ours based locally made a sign saying ‘Chateau de Puymouche’ - absolutely perfect!
Shutters
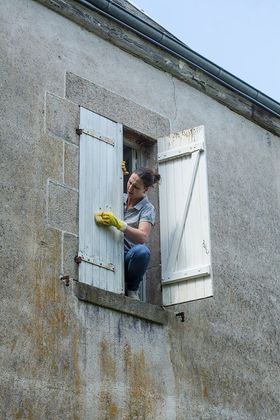
While we are discussing wood, it's worth mentioning that the many windows of the house all had shutters (apart from the study for some reason). They were old and a dirty white, with some rotting wood and grey colour. Shutters are a wonderful invention, great for keeping the heat of the midday sun out but with the ability to open them just a little, to let some air in if wanted. When you shut them at night they block out all the light and a lot of noise too. They are great to help securely lock your house up tight if you are going out. However, certain villages and towns have rules they enforce as to the colour shutters must be painted. These rules get even more strict if you are within sight of a church or cathedral, apparently. We did wonder if we were allowed to change the colour of our ‘white’ shabby shutters, so we enquired at the Mairie but were informed that we could change them to any colour we liked.
We tried to paint the shutters an olive green colour, which was the colour we had painted the shutters and door of the gite. Whilst this colour looked great on the gite, the stone work on the gite was dark and so the green contrasted really well. However on the house, which was rendered a creamy colour, this green just looked disgusting and all merged into one somehow. So we quickly changed it. We decided to stick with white for the shutters which would look clean and we knew it was a colour that coordinated well. Of course, we didn't just paint the shutters they had to be cleaned, rubbed down and often removed for fixing, altering and improving. The hardware attached to the shutters was picked out with black paint to not only look attractive but also to protect the shutters for years to come.
Between the window and shutters in our dressing room there had been a wasps or hornets nest for many years, long since abandoned now. Before we could do anything painting with the shutters or the window, we had to prize off old cristalised sugar that had formed on the granite ledge all the way around the window, and on the frame and shutters. It was like rock itself with a caramel smell to it. It took a lot of 'whizzing' with hand drills and sanders to remove all of this and many days too!
In painting the shutters, we also had to paint the bars at the windows for the ground floor rooms. This was a fiddly, laborious job requiring rubbing down of the metal and priming before the painting could take place.
The Un-Snug
The room next to the lounge, which we called the snug, was one of the last rooms to be decorated and was really in need of some TLC and reparation. It was situated to the right of the lounge (as you come in from the front door) and was one of the two rooms over the cellar (cave) so this room was often freezing and damp. The wood around the windows and doors had suffered because of the damp and the walls had some old paint effect on them with an original design of the time. Dale had to replace a lot of the rotten wood and replace several panes of glass in the window. This room had been a nesting area for the mice for a long time (months, years? Who knew), so it was quite a task to get this room habitable.
As the walls were so uneven, they needed re-plastering and filling in many places to make the walls normal again.
Eventually we wallpapered in this room, but the wallpaper kept coming unstuck from the walls due to the damp! So Dale had to use sealer on the walls firstly, before wallpapering, quite a palava but at least it would get over the damp problem. Finally it was looking good. The colour scheme we went for was really determined by a beautiful set of chairs and settee in green and gold with a small red fleck. The room became gold on top and dark brown on the lower half. Dale made a pattern and painted a gold frame stencil around the brown half, imitating the original design. With a beautiful green and gold rug, the small comfy three piece suite and the walls finished, the room looked magnificent. The marble fireplace was intact, but the gilt mirror above it had really suffered from the damp so most of the detailing around the edges had come away. Dale tried to replicate this detailing, but it looked rubbish, so he made good and re-lacquered in gold, et voilà!
We had intended this room to be the ‘winter snug’ for when the other lounge got too cold to bear. We had set up a TV and games console in there, but it was so blooming cold to go into during the winter, and so lovely outside during the summer, that we never used it. As the wood burner in the lounge was running the central heating for the house with its back boiler, it would have been pointless to have two fires lit downstairs. We found this was a lovely place to display some more of Dale's photography.
Authentic Retro Wallpaper
On from the snug was the study, Dale and I both had desks and workspaces in here, and this is where I worked from every day. For much of my time in this house I was working for a company based in the UK and spent a good part of my day in this room. Like the snug, the study was also over the cellar, and as I spent many hours in there on the computer, my feet and hands grew colder and colder as I have explained before.
More plastering was needed in here too, before he could start any decorating. Dale insulated the floor and put down additional wood flooring to try to overcome this problem, which did help a lot.
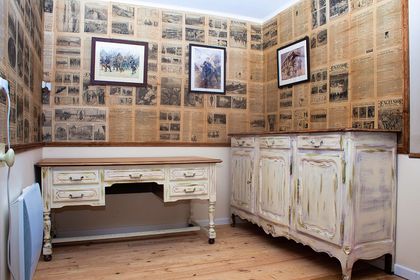
He had a wonderful idea for the walls. Using some of the newspapers we had surplus in the house he started to make an interesting and unusual wallpaper. The newspapers were L’Exelsior, detailing World War One as it happened.
He covered the entire study in newspaper sheets, with words and pictures illustrating WWI from a French perspective. He salvaged some beautiful prints from the L’Illustration newspapers we found in the loft and put them in frames. Dale had to replace the window as it was so rotten and, by adding a dado rail and some new lighting, the room was transformed and no longer felt like a dingy prison. It became a real talking point when any guests came.
Utility transformation
The utility room was adjacent to the kitchen and housed the back of the bread oven, along with lots and lots of ‘stuff’. When we first arrived we found that the floor in the main part of this room had totally collapsed due to the amount of hoarded junk piled in here. After three days of clearing stuff by Dale, Dalton and me, we finally started to see what was going on. Half of the room was over the top of the inside cellar, so the weight causing the collapse had meant the cellar had been filled up over time. Now this was clear, we could enter the internal cellar, down the very rickety stairs to see the many bottles of home brewed wine, champagne and other ancient home made delights.
Dale had the task of making the utility floor safe again, by replacing the floor joists, then inserting oak floorboards and joists that he found in the barn, and then covering with tomets (they are a square floor clay tile in a red colour) which we also found stored in a barn and in the loft. The room was once again a usable space! At the back of the bread oven was a large area which we imagine was a place where loaves were put to prove until baking time. We used it for storing paint, varnish and other DIY things. The whole utility room was a great space for storage, a larder and as an overflow for the kitchen if ever required.
Typically Creusoise
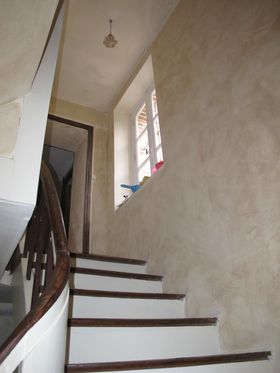
The stairs that occupied the jutting out section of the house were typical of the area, very Creusoise apparently. They went through a process of transformation as they were cleaned, buffed and polished. They were so super polished at one point it was dangerous walking down them with socks on, so it was better when they weren’t quite so polished!
Gated Entrance
There were other outbuildings that needed repairing and the garden was a huge undertaking to sort out, but perhaps one of the most important and impressive looking tasks undertaken was the implementation of the gate and wall to the entrance of the property. For the many years it had stayed unlived in, the local farmers and walkers had used a path running outside the kitchen window as a public footpath. One day we even had a row with someone as this minor track featured on their satnav so they wanted to use it as a road, despite it being private - no way!
So we decided that a gate at the entrance would put a stop to motorbikes driving down and people turning round in our garden. We had small children and I didn’t want them to get run over in their own space.
Dale consulted the deeds and ensured that he mapped out where the wall and gates should go, measuring the dimensions of the gates we would then buy. He bought square hollow bricks to make the pillars to support the gates either side, which would eventually be plastered.
Then Dale decided to make a stone wall on either side, one of which incorporated our post box. Having never made a stone wall before, he firstly practised and honed his skills on a stone wall in the garden. He found rocks from all over the property, including from where a part of an old house had tumbled down many years before (I’m sure I will talk about this funny half-house soon, how its roof needed urgent repair and how we used this space). He cemented all the stones in place, after carefully choosing which stone was to be fitted into the next gap.
We had some friends in the neighbouring hamlet who were Dutch and spoke very good English. They were very nice, intelligent and interesting people who had been doing their French house up for years. They came down to visit us on one of their trips to La Creuse. Dale was so proud to show his new wall to them, and the husband said in a very matter of fact way: ‘It is a known fact that an Englishman can build a dry stone wall’ Well, we never knew that, and I hope you all now know this!
Over the five and a half years we lived in this beautiful house, Dale (and I helped) adapted, improved and decorated it in a sympathetic way in keeping with its style and age. It took a long time to achieve, as we tried to maintain a balance of suitable furniture and decor, without wanting to live in a museum. We discovered that living in a stone house was cold for many months of the year and then for a few precious summer months it was a blessing. We know now that, despite the walls being 60 cms thick, we should have insulated them to keep the warmth in and the cold out, as we did with the gite. I will tell you about the gite and the necessary hurdles we had to jump through another time.
We learnt a lot living in France, from the many skills Dale developed and the ‘hats’ he wore, the development of the house, to the gifts it gave us, along with friendships and a relaxed and wonderful way of life.
If you would like to read more about our travels, adventures and happenings then you could join the facebook page for updates: The Unadventurous Traveller and follow this blog.
Please share this with your friends so more people can read it, thank you.
See you next time!
Catherine
Previous Blogs:
#4 Signing and Doing it up - Part 1
#3 France - a new life, a new home
#2 Get the ball rolling
#1 How did we get here?
#Moving to Spain,
#Renovating property in Spain,
#Moving to France,
#Renovating property in France,
#Moving abroad with kids,
#Moving to France with Kids,
#Moving to Spain with kids,
#Renovating property abroad,
#Digital nomad life,
#Renovations in Spain,
#Renovations in France,
#How to survive moving to a new country,
#LifeinFrance
#LifeinSpain
#LivinginLaCreuse
#LivinginCatalonia
#Movingoffgrid
#Livingoffgrid
#Expats
#Renovations
#Doingitup
#Offgridinspain












Once again a really enjoyable read what a clever chap Dale is .
ReplyDeleteThanks Gary, yes he is! Hard working and quite ingenious to get around problems. Wait till you see the latest project we have (he has) taken on! See blog 1 and 2... :-)
Delete